Introduction
Howdy, aspiring web publishers! Joe Hills here, writing as I always do in Nashville, Tennessee, and today I’d like to welcome you to my new series “Joe Hills says you can Code.”
This series welcomes folks with little or no programming experience to the power of creating and publishing your own work on the internet. Future lessons will focus on publishing your first web page, expanding your work into an entire web site, and ways to manage sprawling amounts of work like blog posts—but first I’m going to teach you how to make a bad web page.
A bad web page is a starting point, like an illustrator’s pencil sketch or a sculptor’s rough concepts. We’ll make something to prove we can make it, examine it in light of what we’ve learned, and then ultimately re-create, refine, and replace it with something better.
Aside: What does Joe even know anyway? I’ve been marking up web pages in html and styling them with css for fun since I was in middle school in 1999. I started building websites professionally as a LAMP developer (Linux, Apache, MySQL, PHP) starting in college in late 2006. You can check my LinkedIn profile for more specifics.
The simplest possible bad web page
The simplest possible web page is a text file saved with an .html extension. That’s right, you can just type a bunch of text into Notepad and save it as mybadwebpage.html, and when you double-click on that, it’ll open in a web browser, just like if you’d sent a request to a web server. So, let’s do that.
Step 1: Open a plaintext editor, like Notepad in Windows or bbEdit on MacOS. Rabbit hole warning, professional developers have very strong feelings about why the text editor they use is the best. You could spend weeks just trying to compare and mess around with different options, but sticking with something dead simple is all you need to get started.
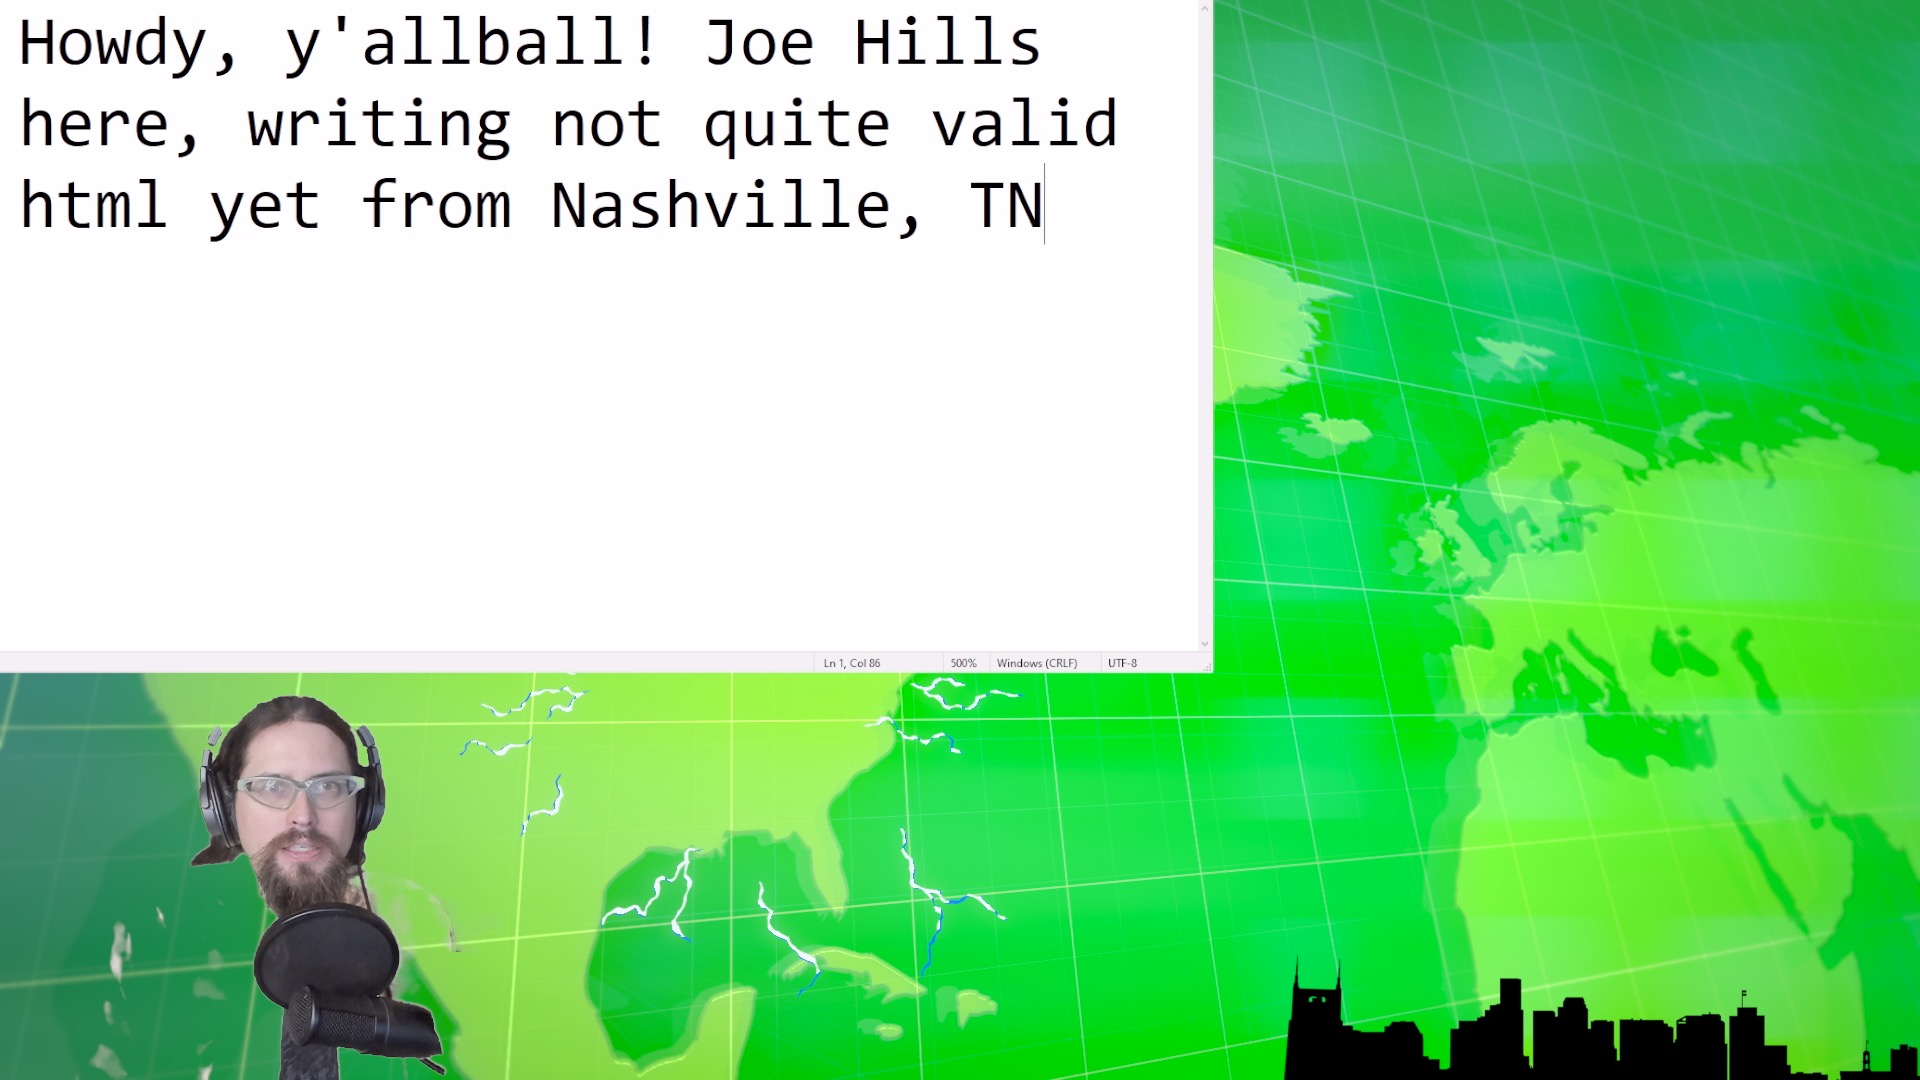
Step 2: Write something in the text editor. The traditional programming example would suggest you write, “Hello, World!”—but I think you should express what’s in your own heart. For my part, I’m writing:
Howdy, y'allball! Joe Hills here, writing not yet entirely valid html from Nashville, TN!
Step 3: Save the file with a .html extension somewhere you can find it.
Step 4: Find it. If you can’t try step 3 again.
Step 5: Open the file in your web browser.
Step 6: Look at that!
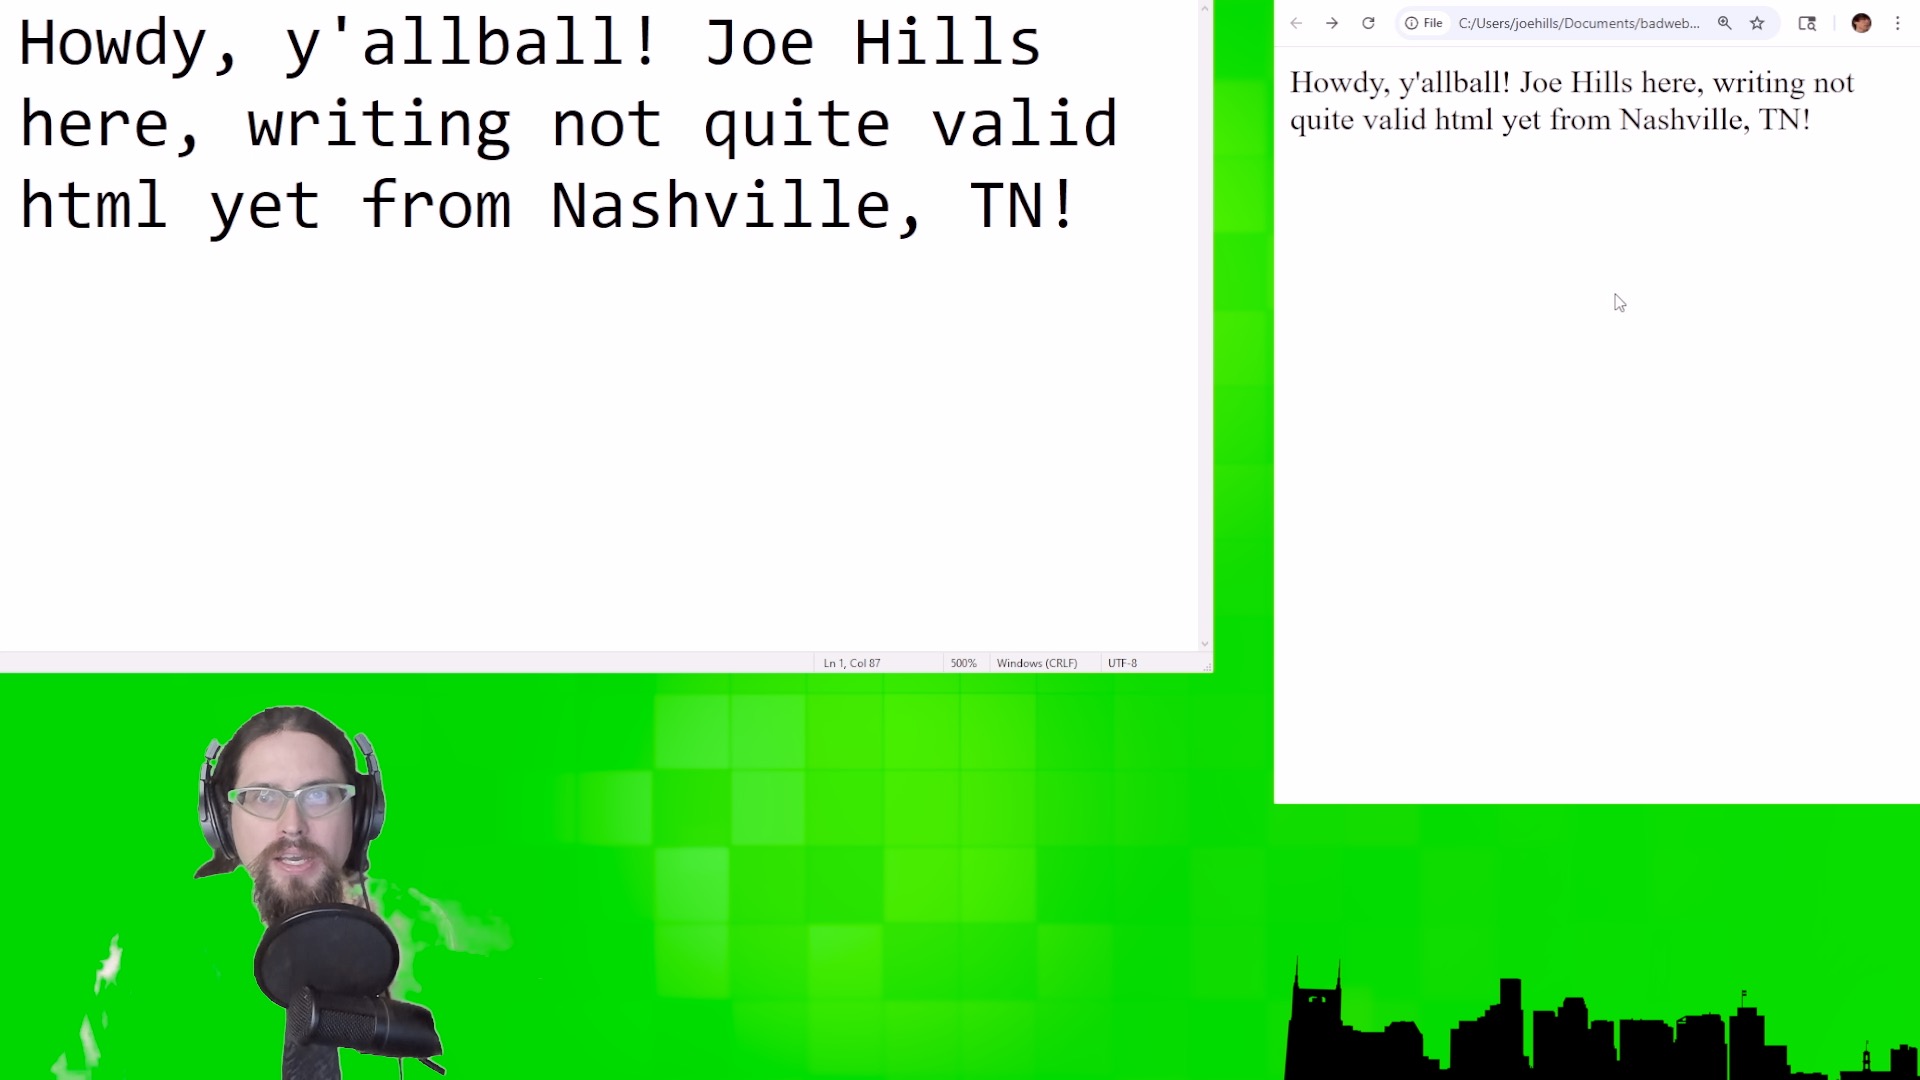
Congratulations, you made a bad web page! If you uploaded that file to a web server right now, someone who accessed it would see exactly what you’re looking at. We’ll get to hosting and self-publishing in Lesson 2, for right now, let’s focus on adding actual html tags to our html file.
Once more, with HTML
Before we start adding html tags, we’ll add an instruction at the top of the file for the web browser to interpret the document as html:
<!DOCTYPE html>
That done, we can start using html tags around text in our file.
If you’ve used markdown or other markup languages, you’re probably loosely familiar with the idea of adding tags around text—but either way, you’ll pick it up fast.
Headings, paragraphs, and lists
Let’s say we wanted to add a header above the text we wrote earlier. We can insert a new line above that with “Greetings!” and save our file, but when we open it, all the text has run together. That’s because HTML tags are used to separate elements, like headers and paragraphs.
If we add an opening <h1> tag and a closing </h1> tag before and after “Greetings” and an opening <p> tag and a closing </p> tag around our other text, we can save and reload the file in our browser to see our header and our paragraph are now both separate and visually distinct.
Let’s add another header, “Some websites I recommend” You’ll wanna wrap that in <h1> tags as well.
<h1>Some websites I recommend</h1>
In addition to paragraphs and headings, one of the most common ways to structure text in html is as a list. There’s a few kinds of lists, but the simplest is the unordered list, which opens with a <ul> tag and closes with a </ul> tag. Each list item inside a list opens with an <li> tag and closes with a </li> tag.
For my list, I’m going to list three websites hosted by folks that I appreciate.
<ul>

<li>gamersoutreach.org</li>

<li>wikipedia.org</li>

<li>lovetropics.org</li>

</ul>
If you create a list like that, save it, and reload your html file, you should see something like this:

That’s progress, but I bet you’d like those websites to be clickable links? Good news, the HT in HTML is HyperText, which is the original term for links. Side note, the ML is Markup Language, which is why we’re using it to mark up a bunch of text with links.
The anchor tag, which opens with <a> and closes with </a>, can be added around the name of your website to turn that text into a clickable link. To actually tell the browser where to go, you’ll need to add something extra inside the opening <a> tag, a bit of info called an attribute. By setting the text in the href=”” attribute to the precise URL I’d like to point at, I don’t have to clutter the visible portion of my website.
For example, I can set the Love Tropics href=”” attribute to link readers directly to their about page, “https://lovetropics.org/about” while the visible text reads cleanly “Love Tropics.”
Once more with validating
What we’ve got won’t yet meet a bunch of requirements of the HTML5 specification, we can test for what’s missing by copying our code so far into the html checker at: https://validator.w3.org/nu/#textarea
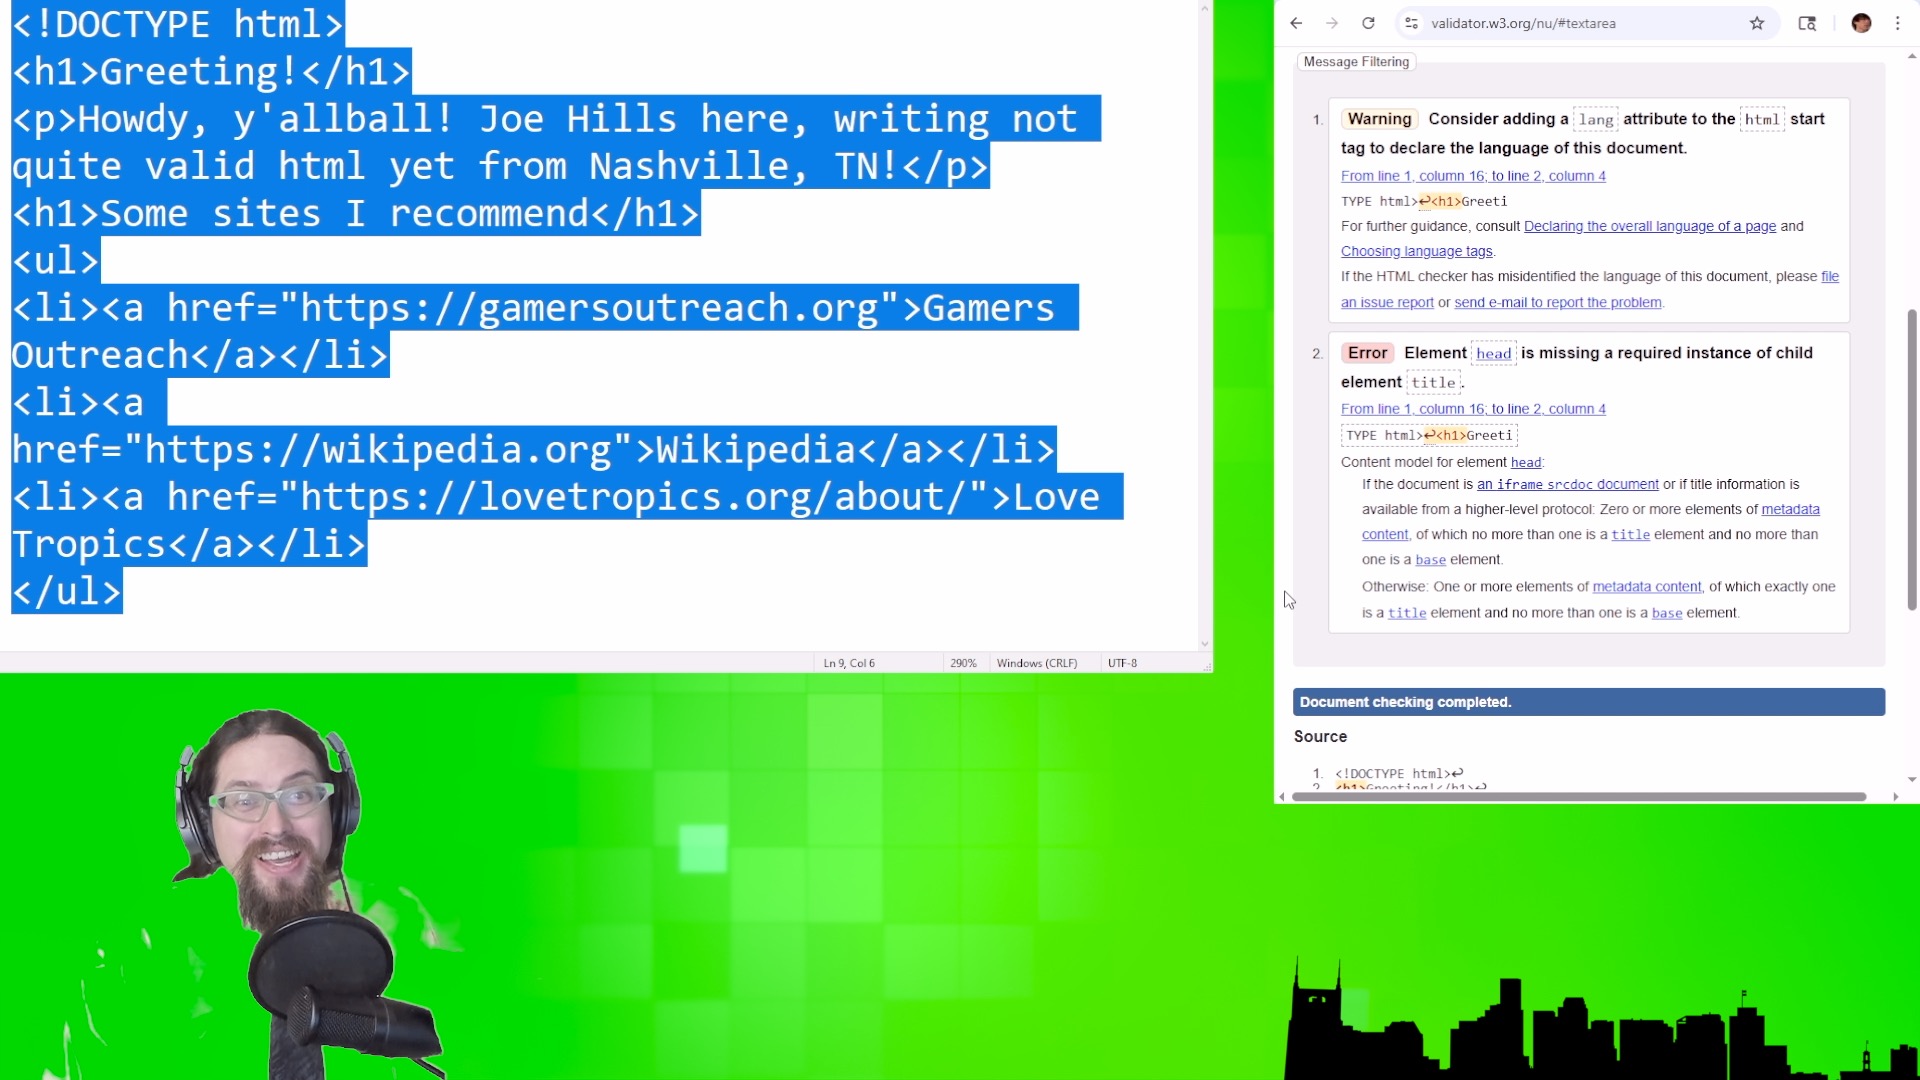
The results of the validator may seem overwhelming, but basically it’s just informing us that we have yet to do the bare minimum to create a standards compliant HTML5 document.
Adding a title and structure
None of the tags we need to add to achieve validation are any more challenging to implement with than the anchor tag.
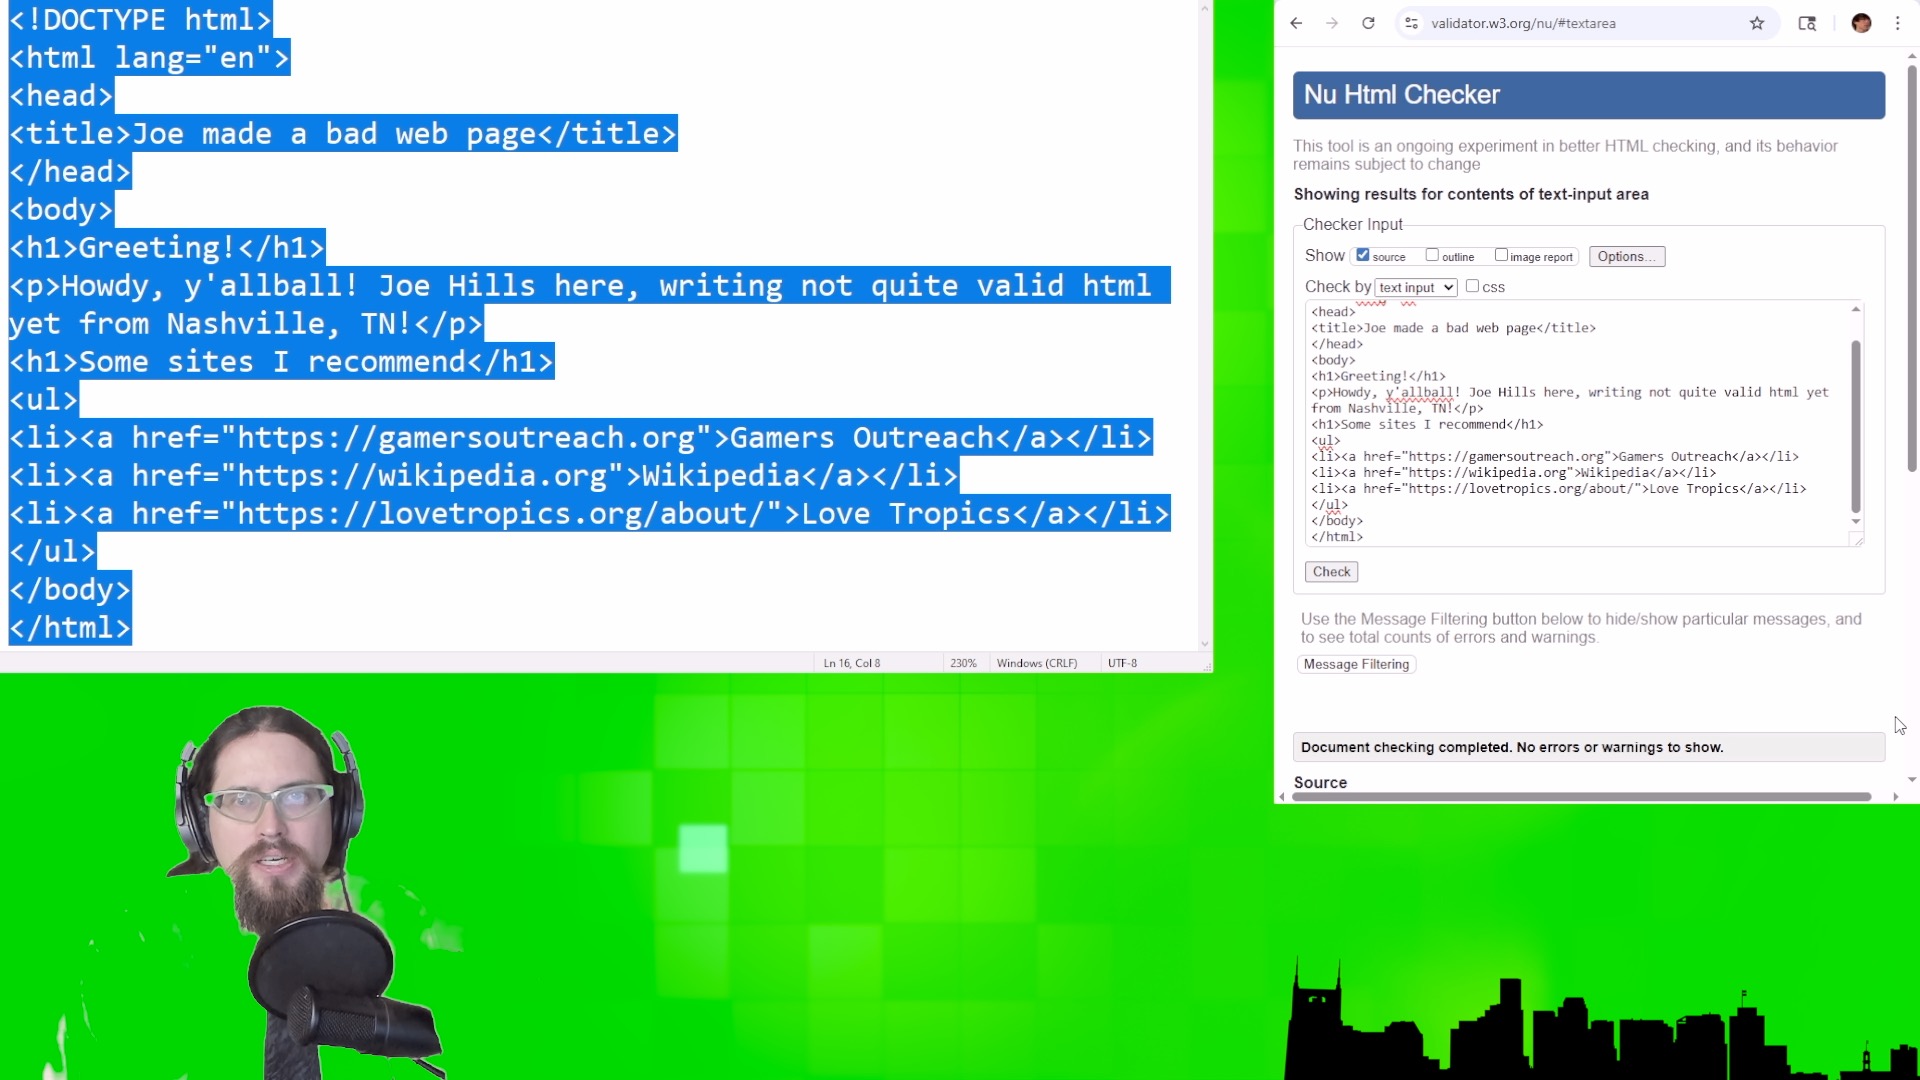
First, we need to add opening and closing <html> tags around our code, starting after the document type declaration, and closing at the bottom of the file. This won’t be fully standards compliant until we add a lang=”en” language attribute, assuming you’re making your site in English. Otherwise, you can look up and add your own language’s code there.
Next, we need to add a title to the web page that will show up in your browser’s title bar or tab list. Since that title is information about your web page, rather than presented inside of your web page, it will go in a special html block right after the opening <html> tag called the <head>. Everything below the closing </head> tag we need to wrap in a pair of <body> tags, like this:
<html lang="en">

<head>

<title>Please, Mister Web Page is my father, call me Ishmael</title>

</head>

<body>

Everything else we've done so far

</body>

</html>
Now, if we copy and paste everything we have into the HTML validator, we get a nice happy response!
Once more, with colors!
You may have noticed by now that your web page isn’t very colorful or visually distinct yet. Every browser has a default set of styles for html elements, and, yup, you’re looking at them now. Let’s quickly learn the fundamentals of how to override those defaults with something prettier!
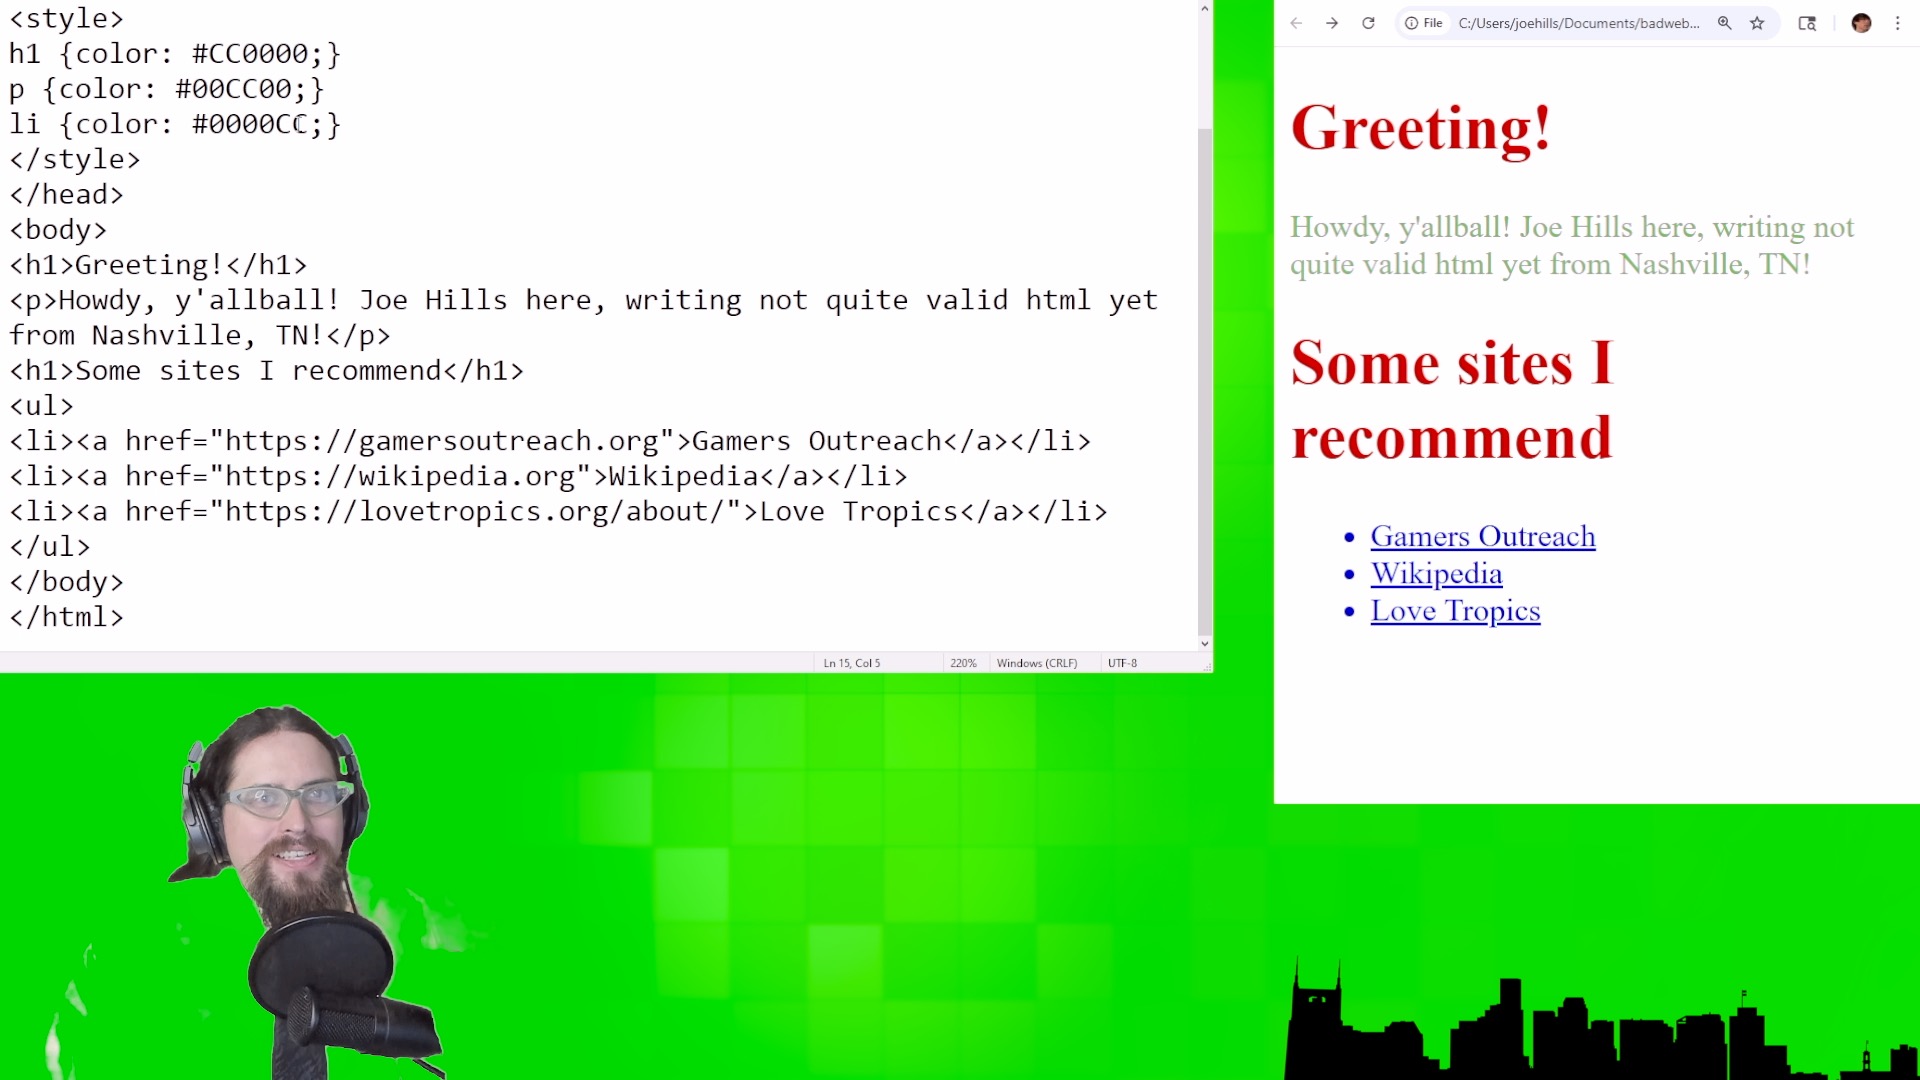
Earlier, we learned the <head> block at the top of the file includes information about your page, and our next tag <style>, will allow us to include CSS styling instructions for the rest of our document.
Since our document has <h1>, <p>, and <li> tags, let’s try adding a splash of color to each by creating a “CSS selector” for each tag followed by a pair of curly braces that will contain “declarations” of how we’d like each to appear.
There are CSS declarations for every imaginable way you could present your work, from font-size to text-align, from background-color to border. The Mozilla Developer Network has great documentation on using each one, so I’ll leave it as an exercise for you to decide how you’d like to customize your first web page.
<style>

h1 {color: #550000;}

p {color: #005500;}

li {color: #000055;}

</style>
Well, that certainly is colorful at least!
All you need to do now is add a CSS selector for the <a> tag and you can color your links any way you like too!
That wasn’t so hard, was it?
Conclusion
This is just the beginning of your web-publishing journey! There’s a lot more to learn about HTML and CSS, and a ton of highly-specific tutorials about their intricacies. I hope you take the time to indulge your curiosity and explore the parts that are most interesting to you!
Since this course is focused on helping you get started in each broader area of practice, we’ll be moving on next to self-publishing in Lesson Two.
However, if our start today has already got you excited about hosting your own web site, I recommend you consider my sponsor NameHero using my affiliate link at https://www.namehero.com/joe and considering the Turbo Cloud plan, since it also includes a domain name with purchase. We’ll get into publishing your page and allowing folks to access it via your domain name next time, though, so there’s no rush!
Thanks so much for taking the time learn something new with me! Until next time, y’all, this is Joe Hills from Nashville, Tennessee. Keep adventuring!